前提:服务器开启8883端口。
1. 双向验证
双向验证的前提是服务器有域名。
(1) 在服务器上创建 CA
可以通过脚本创建:
1
# wget https://github.com/owntracks/tools/raw/master/TLS/generate-CA.sh
打开脚本查看用法。
也可以逐条运行命令创建:
生成无需密码保护的密钥对
1
# openssl genrsa -out ca.key 1024
生成自签名证书
1
2
3
4
5
6
7
8
9
# openssl req -new -x509 -key ca.key -out ca.crt -days 3650
    -----
    Country Name (2 letter code) [XX]:
    State or Province Name (full name) []:
    Locality Name (eg, city) [Default City]:
    Organization Name (eg, company) [Default Company Ltd]:
    Organizational Unit Name (eg, section) []:
    Common Name (eg, your name or your server's hostname) []:**#****此处一定要填入服务器的域名**
    Email Address []:
生成服务器密钥对
1
# openssl genrsa -out server.key 1024
生成证书请求
1
2
3
4
5
6
7
8
9
10
11
12
13
14
# openssl req -new -out server.csr -key server.key
    -----
    Country Name (2 letter code) [XX]:
    State or Province Name (full name) []:
    Locality Name (eg, city) [Default City]:
    Organization Name (eg, company) [Default Company Ltd]:
    Organizational Unit Name (eg, section) []:
    Common Name (eg, your name or your server's hostname) []: **#****此处一定要填入服务器的域名**
    Email Address []:

    Please enter the following 'extra' attributes
    to be sent with your certificate request
    A challenge password []:
    An optional company name []:
自签证书
1
# openssl x509 -req -in server.csr -out server.crt -signkey server.key -CA ca.crt -CAkey ca.key -CAcreateserial -days 3650
当前目录下会产生如下文件:
| 文件 | 描述 |
|---|---|
| ca.crt | |
| ca.key | |
| ca.srl | |
| server.crt | |
| server.key | |
| server.csr | |
| client.crt | |
| client.key | |
| client.csr |
运行以下命令将ca.key转换为PKCS8格式,为后续工作做准备
1
# openssl pkcs8 -topk8 -inform PEM -outform PEM -in ca.key -out ca.pkcs8.key -nocrypt
(2) 配置 Mosquitto(服务器)
在Mosquitto的安装目录下,创建一个目录(例如:‘certs’),并将一下文件复制到该目录下面:
- /etc/mosquitto/certs/ca.crt
- /etc/mosquitto/certs/server.crt
- /etc/mosquitto/certs/server.key
修改Mosquitto的配置文件:
1
vim /etc/mosquitto/mosquitto.conf
1
2
3
4
5
6
7
8
9
10
11
12
13
14
15
16
17
18
19
20
21
22
23
24
25
26
27
28
29
30
31
32
33
34
35
36
37
38
39
40
41
42
43
44
45
46
47
48
49
# =================================================================
# Default listener
# =================================================================

# IP address/hostname to bind the default listener to. If not
# given, the default listener will not be bound to a specific
# address and so will be accessible to all network interfaces.
# bind_address ip-address/host name
#bind_address

# Port to use for the default listener.
port 8883

…

# -----------------------------------------------------------------
# Certificate based SSL/TLS support
# -----------------------------------------------------------------
# The following options can be used to enable SSL/TLS support for
# this listener. Note that the recommended port for MQTT over TLS
# is 8883, but this must be set manually.
#
# See also the mosquitto-tls man page.

# At least one of cafile or capath must be defined. They both
# define methods of accessing the PEM encoded Certificate
# Authority certificates that have signed your server certificate
# and that you wish to trust.
# cafile defines the path to a file containing the CA certificates.
# capath defines a directory that will be searched for files
# containing the CA certificates. For capath to work correctly, the
# certificate files must have ".crt" as the file ending and you must run
# "c_rehash <path to capath>" each time you add/remove a certificate.
cafile /etc/mosquitto/certs/mqtt_ca.crt
#capath

# Path to the PEM encoded server certificate.
certfile /etc/mosquitto/certs/mqtt_broker.crt

# Path to the PEM encoded keyfile.
keyfile /etc/mosquitto/certs/mqtt_broker.key

# This option defines the version of the TLS protocol to use for this listener.
# The default value allows v1.2, v1.1 and v1.0, if they are all supported by
# the version of openssl that the broker was compiled against. For openssl >=
# 1.0.1 the valid values are tlsv1.2 tlsv1.1 and tlsv1. For openssl < 1.0.1 the
# valid values are tlsv1.
tls_version tlsv1
(3) 配置 Kura(网关)
创建 keystore
在Kura所在的机器上运行以下命令(‘[password]’为密码,必要的话将其进行修改):
1
2
3
4
$ sudo mkdir -p /opt/eclipse/security
$ cd /opt/eclipse/security
$ curl [https://www.symantec.com/content/en/us/enterprise/verisign/roots/VeriSign-Class%203-Public-Primary-Certification-Authority-G5.pem](https://www.symantec.com/content/en/us/enterprise/verisign/roots/VeriSign-Class 3-Public-Primary-Certification-Authority-G5.pem) > /tmp/root-CA.pem
$ sudo keytool -import -trustcacerts -alias verisign -file /tmp/root-CA.pem -keystore cacerts -storepass **[password]**
如果提示已经存在证书,输入’yes’继续。
添加 CA
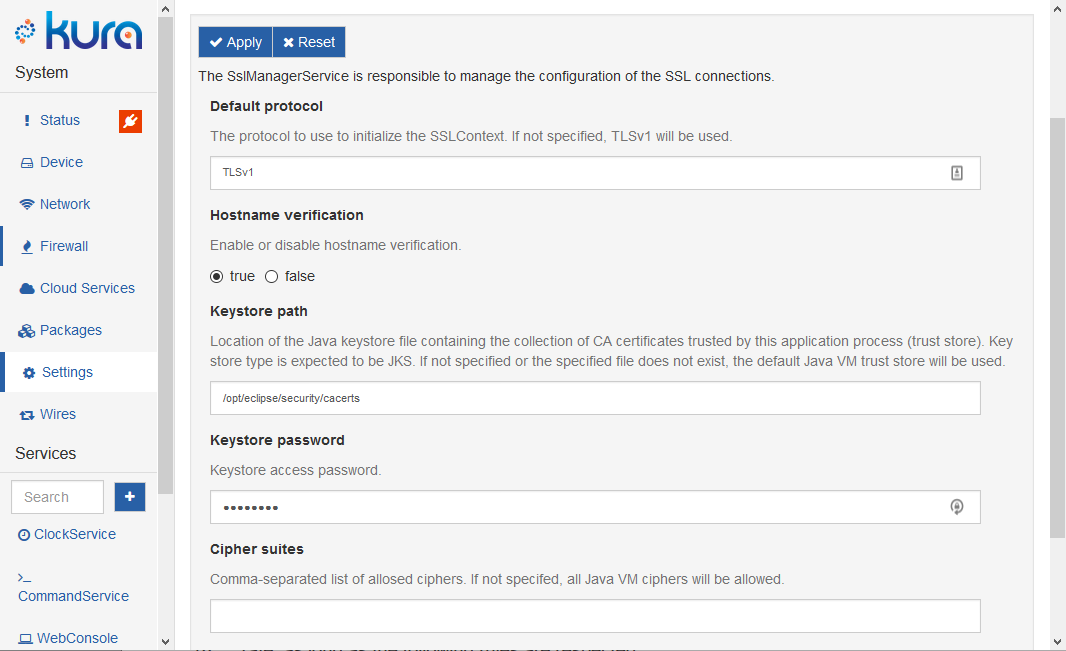
在 Kura 的管理界面(浏览器),选择 Setting->SSL Configuration,将 Hostname verification 的值设置为 true,然后根据上一步的设置,更改 Keystore path 和 Keystosre path 的值。
选择 Device SSL Certificate 选项卡,点击需要设置的云服务。
在 Storage Alias 内输入 ssl 的别名,例如 ssl-1 ,将之前准备好的 ca.pkcs8.key 文件的内容粘贴到 Private Kye 区域内,将 ca.crt 文件的内容粘贴到 Certificate 区域内。
选择 Server SSL Certificate 选项卡,在 StorageAlias 内输入 ssl 的别名,将 server.crt 文件的内容粘贴到 Certificate 区域中。
设置启用 ssl 连接
选择 Cloud Services->MqttDataTransport,将 broker-url 的值改为如下形式:
1
mqtts://[broker-url]:8883
将 ssl.hostname.verification 的值改为 True,将 ssl.certificate.alias 的值设为之前添加的 device ssl certificate 的别名。
2. 单向验证
服务器没有域名时,仅能进行单向验证(仅能进行服务器对网关的验证)。
除以下几点外,其余配置过程与双向验证的配置过程相同。
生成自签名证书和服务器请求时,不对Common Name做要求。
在Kura中添加CA时,无需添加Server SSL Certificate。
关闭主机名验证:
Settings->SSL Configuration中,Hostname verification的值设为false。
Cloud Services->MqttDataTransport中,ssl.hostname.verification的值设为False。
3. 其他
keytool 命令
查看keystore内容:
1
$ keytool -list -v -keystore **[path to keystore]** -storepass **[password]**
查看证书内容:
1
$ keytool -printcert -v -file **[file.crt]**
删除证书
1
$ keytool -delete -alias **[path to keystore]**r -keystore cacerts -storepass **[password]**
参考
[1] http://eclipse.github.io/kura/config/ssl-configuration.html